I will be doing a giveaway!
Interested?
I WILL be doing a giveaway soon just in time for this lovely Christmas season!!
The item or itemS will range from either a full sized makeup product, an item of hair care, rolling stone magazine, or something random!
be sure to come back SOON to find out more! <3
Okay, so clearly you're interested in bleaching those lovely locks of hair of yours.
Here, I'll be giving you step by steps ways of doing so, SAFELY.
If you're using a premixed developer, and powder packet then just combine the two. Be sure to use gloves because it can hurt the skin, and trust me, that sucker hurts.
If you've got the biggo' container of powdered bleach, and a container of either 20, 30, or 40 Creme developer, just get a container to stick it in such a bowl, etc, and put one scoop of powder (Container should have a scoop thing) and about 3-4 spoonfuls of the creme developer, mix well.
After mixing them, and shaking the bottle well, or stirring the mixture. set it down.
If you're doing your whole head:
Section your hair out from the front section, mid section, and ends of hair. any sort of hair ties are good c:
If your doing ONE area, be sure to section it AWAY from the hair that's not going to be bleached.
After doing the sectioning, begin to apply the bleach , starting from the ends, and midsection of the hair.
The best way to do it is to be sure you get enough in the spots, and everywhere. Otherwise it'll look bad.
You then do the top and roots of the hair.
To apply it you can either poor a little on your GLOVED hand, and apply it to your hair cautiously, or you may squirt bits of the bleach into your hair sections you're working on.
After, you wait 25-50 minutes. BE SURE to check on the hair, and when you get the desired lightning, simply wash all of the bleach out with luke warm to cool water. No shampooing needed, conditioner is a must.
Tips: L'oreal's lightning systems work perfectly. It's a tad bit expensive, but contains everything you need.
Clairol bleach packets are inexpensive, and very good to use. it's quick, and in various sizes of packets.
I would NOT recommend using Splat's bleach that comes in the hair dye box, it takes too long and that's harmful, but that's my opinion. :)
If while your bleach is in your hair and it gets hard/dry feeling. Reapply some bleach, or tiny drops of water because if the substance in your hair dries up, it's not working fast, or good enough.
If your lightened area is gold, or brassy. apply some toning conditioner and shampoo.
Do not exceed the limit of two hours of leaving the bleach in your hair
NEVER Rebleach entire head of hair right after you've bleached it.
Wait a day or two.
Anyways, have fun!
 Hello, and greetings from creepster land!
Today is the posting of the creepy 'Stretched Smile'
it's so easy, quick, and fun to do!
Materials;;
Any colored lipstick (preferably pinks/ light purples)
White Halloween cream makeup
Black gel eyeliner/black cream makeup
Small, angled cosmetic brush
First you want to apply your lipstick on your lips as usual.
Then dip the cosmetic brush into your black gel eyeliner (or cream makeup) , and carefully make a line from the corner of your top lip to the near end of your cheek, and then the bottom , connect them, making sure its pointed at the end.
You then want to fill in the entire area black! the blacker, the better the effect. also apply black to the edge of your lips, to connect your actual lips to the stretched part.
After that you have to grab your lipstick again, and apply it gently on the top of your upper fake lip, then apply it to your lower fake lip.
You'll soon start seeing the effect!
You have to then grab your angled brush again, clean it, and apply the white cream makeup on it. after you put it on the brush, carefully make little squares in the black part of your 'mouth'
you are then done! a fun, cute, and creepy stretched lip is complete!
You can also do both sides of your mouth, but one side is quite dope.
 Hello fellow bloggers and blogettes!
tonight, I shall be posting the Halloween makeup I did on 10-28-13. also how I did it!
Materials:
*Flour (or latex and fake scar gunk)
*Water
*Your skin tone foundation (makeup)
*Fake blood
*Black cream makeup (or gel eyeliner)
*red and blue food coloring (optional)
*tiny sharp object (preferably a sewing needle)
*various sized cosmetic brushes
*dark purple eyeshadow (optional)
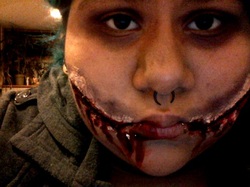
It's pretty much the standard 'chelsea grin/ chelsea smile/ glasgow smile'
so basically a slit smile c;
NOW, details on how I created this realistic, gory look.
I first decided to make 'fake skin' or 'scars' out of all purpose flour. it's cheaper than latex .and whatnot, but of course you may use that if you'd like.
I then mixed flour with warm water, making sure the consistency was more sticky, gooey texture rather than slippery, or wet. (be sure to mix well, and wait till it's 'tacky')
Once you have it mixed up and consistent, you then want to grab two fingers and dip it into your mixture, and get a medium sized goop of it.
You then smear it on one side of your face from the left corner of your mouth, to the mid section of the cheek, obviously you want it to look like a smile shape, you then apply it to the other side of your lip and cheek area.
You let those sections dry, either wait a few minutes, or plug up a blow-dryer on the lowest setting and casually flow it across your face.
Once dry you can apply more of the mixture to thicken the area on your face, it's also best to kind of blend it in with your actual skin.
You can continue with drying and reapplying until you get the perfect amount on!
after the 'scars' dry, you then want to grab a sewing needle or any TINY, but sharp object and carefully poke a line through the 'scars' you just made. so specifically, you want to make a thin slit line in your new skin, be careful not to harm your actual skin.
Once you've done that you want to get a foam, or liquid foundation that resembles your skin tone! you can perhaps use powder, but liquid is better. you Apply it to your face then to the 'scars'. blend carefully.
After that you grab either a black cream makeup for facepaint, black cream eyeliner, or stick eyeliner and a tiny brush and stroke black into the tiny slit you created in the fake skin.
From the black you then want to make sure it's completely black so it could add depth to your slit up mouth :D
and now the fun part! haha .
You grab any sort of fake blood, gel kind to liquid or whatever,
and brush it into the slit of the fake scar and around your lip area, down your jaw and chin anddddddddd down your scars.
I've took note that Walgreens has a 99 cent fake blood that is very jelly-like. it's not perfect, and kind of orangey, but if you use red and a tiny amount of blue food coloring, it'll be perfect!
*optional* if you notice , surrounding my scars look like bruising of the skin. I achieved that look by grabbing a puffy or large cosmetic or art brush and dabbing a dark purple eyeshadow around that scar area! Also on the eyelid and underneath to seem even creepier! easy and fun.
You now have a gory, screwy looking face! yay <3
|
 RSS Feed